Real-time 3D car pose estimation trained on synthetic data
We'll demonstrate how to create a neural network with synthetic data for the task of real-time 3D pose estimation of vehicles.
Chris Laan
Project Overview
Our client had a vision for an app that would guide users to capture higher quality car photos through AR guides and automatic photo capture. This article is focused on the tech that went into building the car pose estimation component. In the app, users are guided to stand at certain angles and distances from the car to capture the best pictures in a standardized way. When the user is in the correct position, high resolution photos are automatically captured.
We needed a way to know roughly where a user is standing in 3d space relative to the car they are photographing. Since this was a prototype app, we only had a few weeks to come up with a working solution. We also limited the recognition to a specific model car to shorten development.
Goals and constraints
-
Short time frame to build a working solution
-
Roughly real-time car pose estimation ( < 150 ms )
-
Limit scope to a specific model of car with varying colors / options
-
App should capture high quality photos
What we tried before building something new
Hoping for a quick off-the-shelf solution for 3d object pose estimation we tested out a few approaches.
Apple’s ARKit 3d object recognition
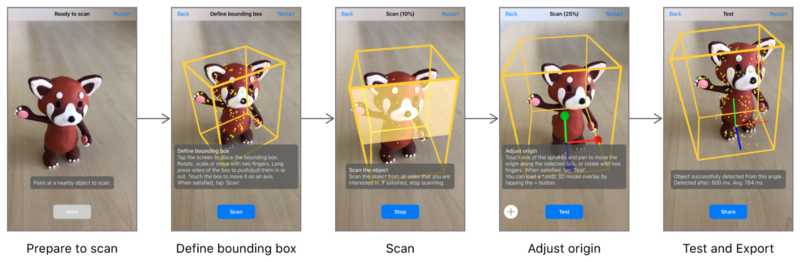
ARKit contains APIs to scan and recognize rigid 3d objects within ARKit. This seemed ideal for us; real-time and built in to ARKit, this would cut development time to zero for this feature. Our main concern here was recognizing different car colors. To test how well ARKit handled this we purchased a small model car in a few different colors.
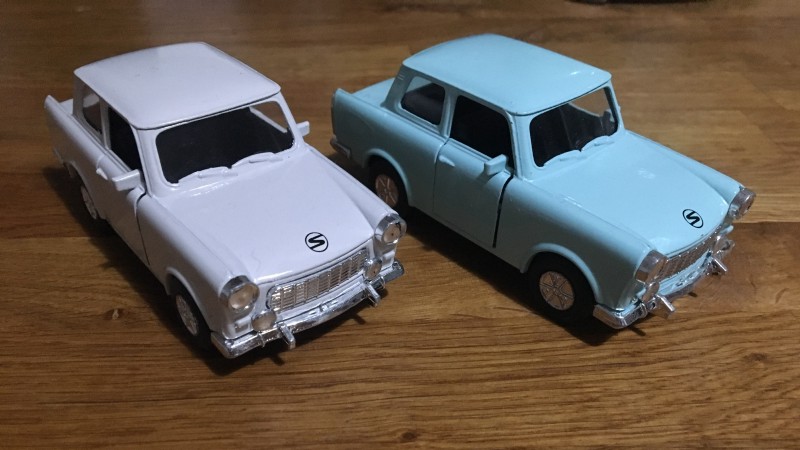
We scanned one color, then tested on a similar color ( i.e. scan white, test on light blue. ) For some cases the recognition did work. It wasn’t perfect, but maybe if we scanned some set of base colors, that would provide enough invariance to recognize any color of the car we might expect to see.
The next step was trying it on real cars. Turns out real cars behaved a bit differently. Even scanning and testing on the exact same car was not reliable. Sometimes the recognized car would be slightly rotated/translated one way or another. Our guess is that the highly reflective paint jobs on cars make it hard for feature-based scanning and recognition to work ( Apple specifically mentions that reflective objects are not suited for 3d recognition in their documentation. )
Third Party SDKs
We did test out a few other SDKs and got similar results as with ARKit. Some libraries required specific ‘initialization templates’ or positions the user needs to match up to kick start the 3d object tracking. This wasn’t ideal since we wanted to guide the user to certain positions, so the recognition needs to work from a wide variety of angles / positions.
Photo quality
One other downside to both ARKit and the SDKs we tried is the quality and resolution of the photos that can be captured while using them. The highest resolution available for capture while using ARKit is 1920x1440. There is also very limited control over focus and exposure when using ARKit. Since the app is all about capturing high quality car photos, we wanted fine control over focus and exposure, in addition to a large image resolution.
Building a neural network based pose estimator
Given our lack of success using third party solutions, combined with the photo quality limitation, we decided to look into building our own solution that would work alongside Apple’s AVFoundation camera APIs. We chose a neural network solution because they are state of the art for pose estimation, and there are a lot of open source projects and research to leverage.
Approaches to pose estimation
Given an image, how do we predict a 3d pose of an object within the image? A common approach involves predicting the image locations a set of known points on a canonical model of the object. For example, given a photo of a car, where is the left headlight in the image? Given enough of these predictions, we can estimate the 3d pose of the original car model relative to the camera taking the photo.
Network Architecture
These days neural networks show impressive accuracy on a wide variety of tasks, but also have the ability to run in real time on mobile devices thanks to network architecture improvements, and faster devices.
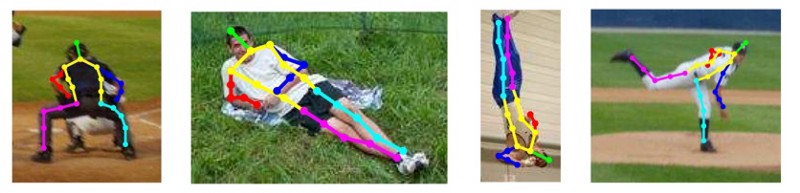
Recently we came across some real-time mobile body pose estimation projects that are based on the CPM and stacked hourglass architectures.
These projects contain a lot of useful info for training and running your own pose estimator on mobile platforms.
The CPM network they used has a MobileNetV2 base and outputs a 2d heatmap for each of the 14 body parts ( left elbow, right knee, etc )
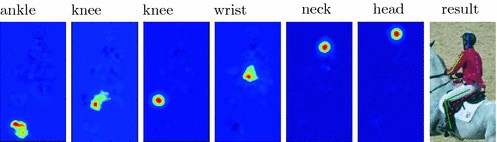
From here, we can essentially take the maximum activation locations for each keypoint layer, and then estimate the 3d car pose using OpenCV’s SolvePnP method. Here is a visualization of our final neural network running on a real car photo, along with the estimated 3d pose. It’s not a perfect fit due to the limited resolution of the output heatmaps. Our model outputs heatmaps with a 192x192 resolution, so there’s a limit to how accurate a single pass will be.
Other approaches and resources
We went with CPM to get up and running quickly, but there are other ways of solving this problem. Another keypoint-based approach is to directly output the 2d keypoints as a list of x,y coordinates. This does limit us to a single car estimate, but for our use case that would be OK. Inspired by Hart Woolery’s post on hand pose estimation, we tested simply adding a few dense layers on top of MobileNet to finally output a 1x28 set of x,y keypoint locations. Surprisingly this worked pretty well out of the box. Given more time we might explore this network further since it was slightly faster than the CPM model we chose.
If you’re just looking for human pose estimation, check out Jameson Toole ‘s recent writeup about fritz.ai’s human pose estimator: https://heartbeat.fritz.ai/pose-estimation-on-ios-with-fritz-60c8e5f7d195
Another method is for the network to directly output the pose parameters of the car rather than go through intermediate 2d keypoints ( see BoxCars , MultiBin ). With the short timeline available we did not rigorously evaluate every direction we could have taken — but these other approaches seem perfectly valid.
Finding a Car Dataset
With a network architecture chosen, the next step is to find a dataset we can use to train it. There’s no shortage of datasets for body pose estimation ( COCO, DensePose, MPII , Overview of body pose datasets, ) but annotated car data is a bit less common. A few datasets exist ( Apollo, PASCAL 3d+ ) but each seemed to have its own set of limitations. Most of the datasets are geared toward self driving cars, so there’s a heavy bias to images coming from the perspective of a car driving down the street — which would be quite different from the images we expect our network to handle. PASCAL 3D has 3d car model annotations, but the cars are typically much older models collected from internet photos. Since we knew the car model ahead of time, training on thousands of other models was not necessary ( though given more time we’d like to extend our network to recognize more car models. ) And finally some datasets have a non-commercial license restriction. Given these shortcomings, we explored synthetic data as a way to tailor the data directly to our expected test environment.
Creating a Synthetic Car Dataset
Synthetic data comes in handy when it’s either impossible or impractical to generate the large amount of training data that many machine learning methods require. Thanks to the video game industry, we can leverage graphics engines like Unity or Unreal engine for rendering, and use 3d assets originally developed for use in games. While we won’t get the rendering quality of a raytracing approach quite yet, the speed and sheer amount of example code and free/cheap assets makes it very attractive. Unity was our choice since we had more experience with it, and time was a factor.
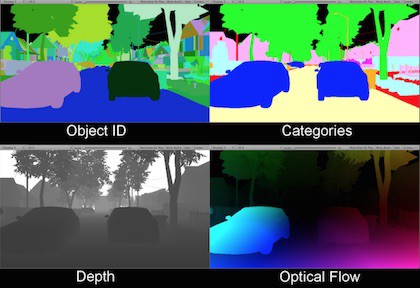
Unity has even published a handy demo project with some common needs around synthetic data. We also recently gave a short talk on training a foot segmentation network for an AR soccer game using SceneKit.
We collected about 10 car models that were similar in shape to our target model along with two variations of the exact car we were testing on.
Finding Car Models
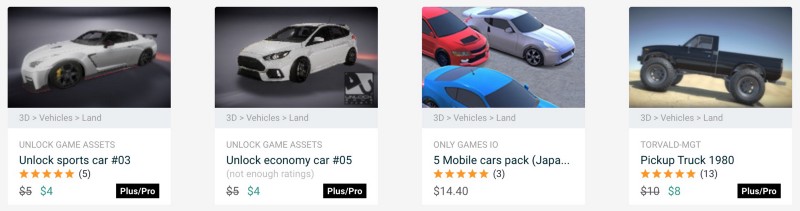
Luckily there are quite a few high quality 3d car models out there. For very high quality models you might pay a few hundred dollars ( see https://squir.com/ ), but there are many cheap or free ones available directly from the Unity asset store:
Annotation
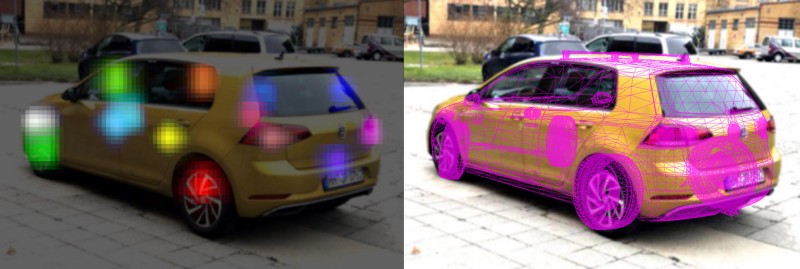
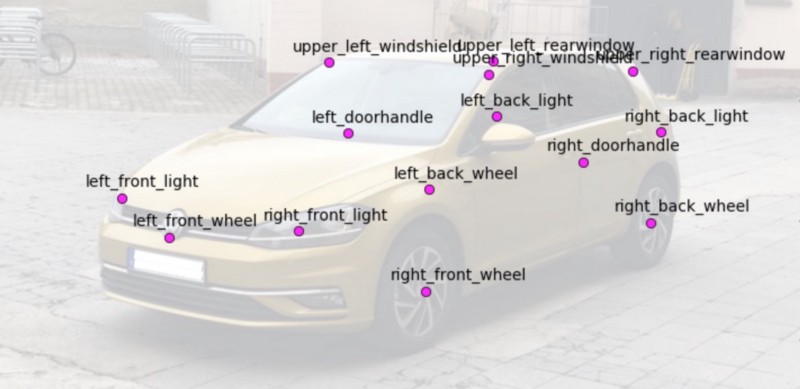
With the models ready the next step was annotating the keypoints that we’re training our network to recognize. Since the body pose network had 14 keypoints, that seemed like a reasonable starting point since it would reduce any modifications to the existing training pipeline. This step required creating 14 empty game objects and positioning them for each car model:
Creating Variations in the Dataset
A big concern when training on synthetic data is whether the model will generalize to real world images. This is an active and evolving research area with many interesting approaches. Apple’s machine learning team has an interesting post about improving the realism of synthetic eye images using GANs. The approach we chose is called domain randomization. By creating lots of variations in the training data distribution, the model should generalize to the target ( real world ) distribution without any fine tuning.
In order to achieve this, we tried to randomize as many aspects of the scene as possible before rendering an image. One major concern up front was that the network would learn to pickup some minor details on the 3d car models that would not generalize to photographs of real cars. There’s an often mentioned ( and possibly untrue ) anecdote about researchers training a tank detector that simply learned what time of day the tanks in the training set were photographed. Whether or not that example is true, when your training and test sets come from different distributions, care needs to be taken to ensure transfer to the new data.
Car Variations
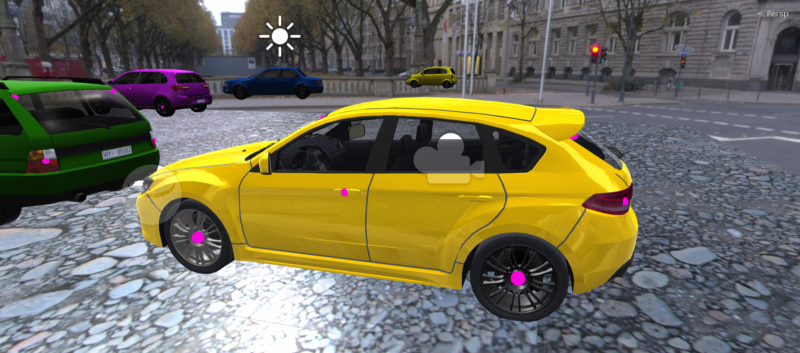
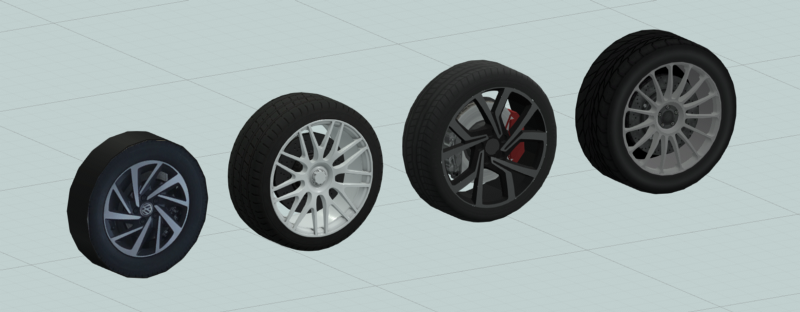
For each car model, we spent some time creating scriptable variations of minor details on the body of the car. Things like paint reflectivity, license plate position and numbering, window tint, car rim style and position, and a few others. We also slightly scaled the car itself along its local axes.

Environment / background
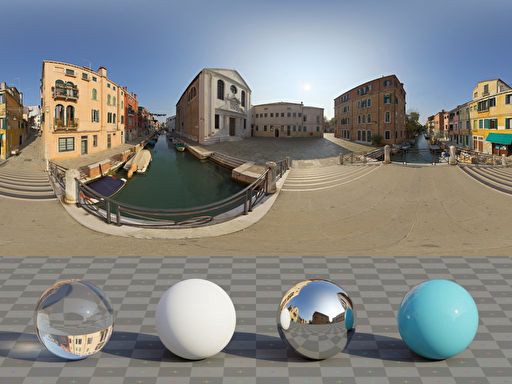
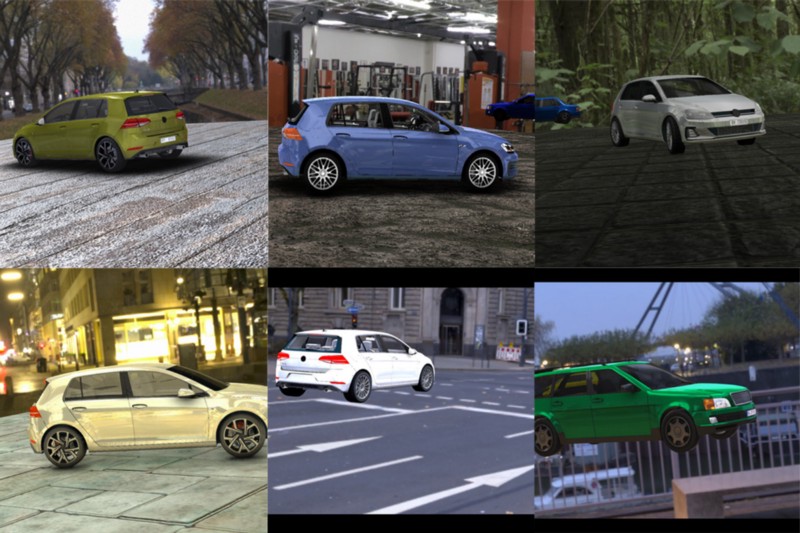
Initially we started to build & buy a few scenes containing buildings and real 3d structure. Finding high quality photorealistic scenes was proving difficult and would get expensive and time consuming. Luckily, we came across an great website called https://hdrihaven.com / that provides free environment maps at very high resolutions. These are essentially 360 HDR panoramas that render behind your geometry and can provide lighting and reflections on objects in the scene. We also parametrically vary the reflection and exposure intensities via our rendering scripts.
Along with the skybox, we created a simple plane as a floor under the car. Applying different materials to the floor and occasionally hiding it all together provides a lot of visual diversity:
Post-processing Effects
Unity has a feature called “Post Processing Stack” — which are basically instagram filters for your 3d scene. These effects might include things like blur, color grading, etc. You can add it to your scene via the Package Manager or asset store, depending on your version of Unity. Along with the built in post processing stack, we downloaded another set of filters from the asset store called SC Post Effects Pack for 25$. Here are a few renders varying only the combination of post processing filters:
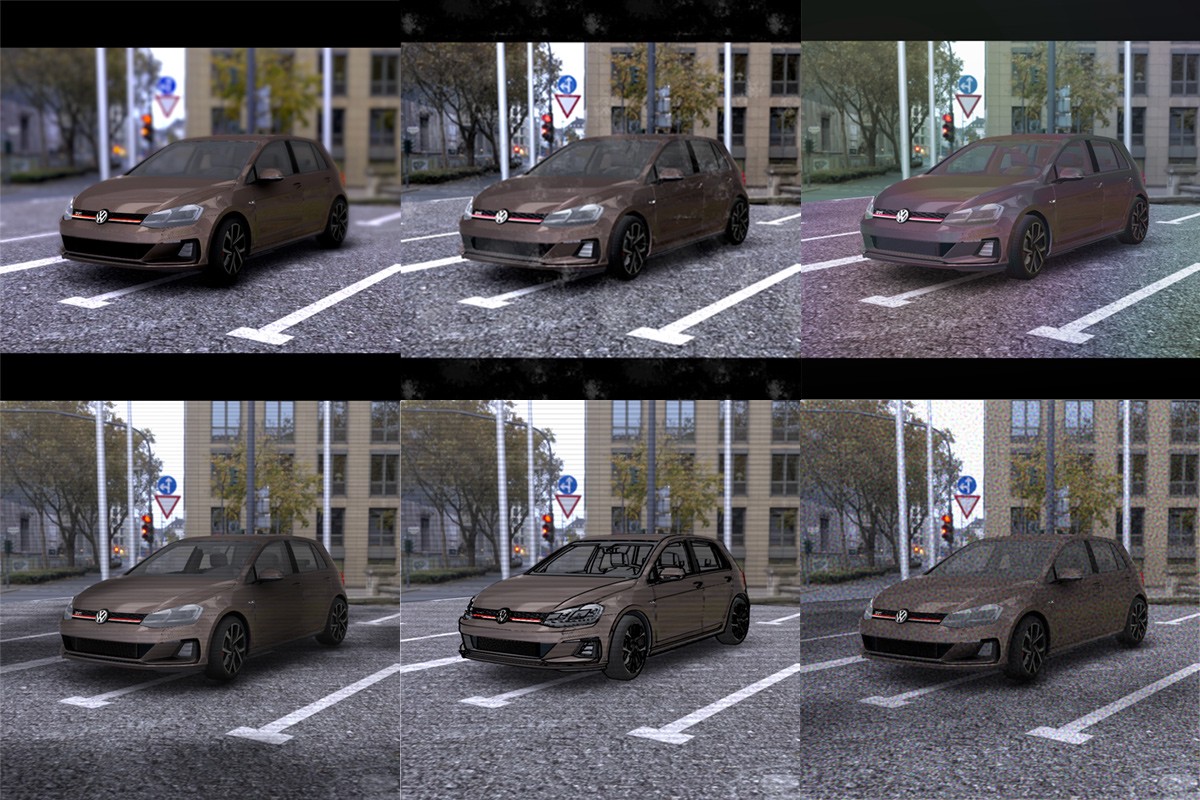
The effects are subtle and might be hard to spot. Some seen here are depth of field, noise, cloud shadows, ambient occlusion, edges highlights, hue shift, and black bars. For each of these we also randomly adjust parameters for even more variations.
Putting it all together
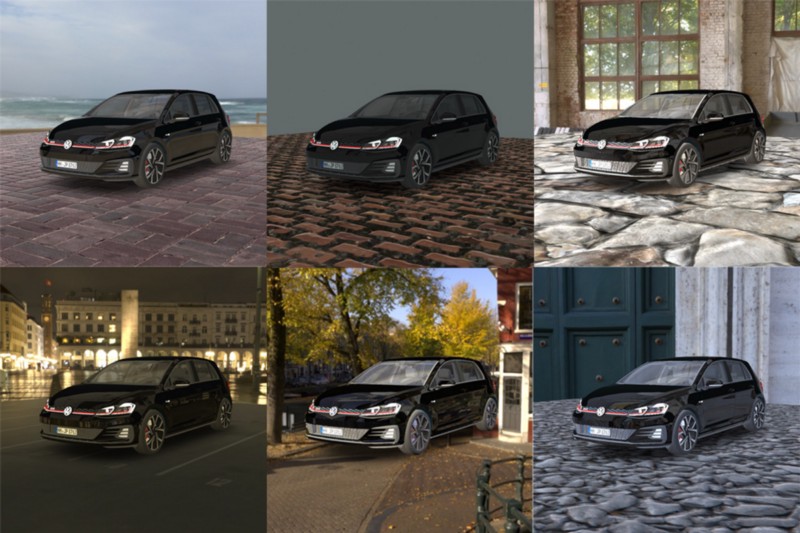
Applying all the variations we end up with images like these:
Even though these don’t look like real street scenes, the many variations of the background and lighting should force the network to pick up on car features that remain constant throughout all the photos. If we only used a street scene, our detector would probably incorporate aspects of the street scene into its features; expecting certain shadow and lighting characteristics to always accompany the car itself.
Creating a Small Validation Dataset
Our concern of dataset bias led us to manually annotate some actual images of cars with 3d keypoints. Manually annotating 14 keypoints one by one is fairly time consuming — especially for occluded keypoints. To speed things up we threw together a very basic wxPython application that only requires labelling a few keypoints per image. To do this we use OpenCV’s SolvePnP to fit the 3d car model given those initial keypoints, then project the other keypoints into the image. Once annotated, we applied random image augmentations using the imgaug library. Thankfully imgaug supports transforming the 2d keypoints along with the image, so you don’t have to manually transform the point positions. After augmentation we had around 1500 images for validating our network.
Does it work?
For our use case of a small set of known car models, we were quite happy with the results on the first go round. Our assumption was that we’d need to incorporate more real images into the training, or lean more on transfer learning, but we didn’t end up needing to do so. Even testing on a pretty wide range of cars still gives reasonable results as you can see in the video. The 3d model fitting doesn’t work perfectly on other car shapes since we are fitting a rigid 3d object to another car with different dimensions. There is literature around fitting a flexible parametric car model given keypoints, so we might look into that for a more generic car detector.
Code
Our plan is to release some aspects of the pipeline if we get some time to clean it up and train on more car models. For now we’ve put up the code for a demo iOS app that displays the estimated car pose using ARKit ( keep in mind the model is trained on a fixed viewpoint range & car model. ) If you have a specific question about some part of the project, or need a custom dataset or model, please give us a shout.